Your chef’s knife should glide through a tomato like it’s not even there. Instead, you find yourself pressing down, squashing the fruit, and fighting the blade. A dull knife is more than an annoyance. It is dangerous. A sharp knife requires less force, which means less chance of slipping and cutting yourself. The good news is you do not need to be a professional or spend a fortune to fix it. You just need the right technique and a little patience.
Sharpening a dull knife at home is simple with the right tools and technique. You need a whetstone or honing rod, a steady angle between 15 and 20 degrees, and consistent pressure. Avoid common mistakes like using a pull-through sharpener or ignoring the burr. With practice, you can restore a razor edge in under 15 minutes. Your knife will feel brand new, and your cooking will be safer and more enjoyable.
Why Your Knife Lost Its Edge
Steel is hard, but it is not indestructible. Every time you chop, slice, or dice, the microscopic teeth along the blade bend or break off. Over time, the edge rolls over and becomes rounded. This is normal wear. A dull knife is simply a knife that needs its edge realigned or rebuilt.
Several things speed up this process. Cutting on glass or stone countertops is a fast track to a dull blade. So is tossing your knife into a sink full of dishes where it can bang against metal pans. Even the type of food matters. Cutting through bones, hard squash, or frozen items will dull a blade faster than slicing soft herbs.
Tools of the Trade: What You Actually Need
You do not need a workshop full of gear. Here are the essential tools for how to sharpen a dull knife at home.
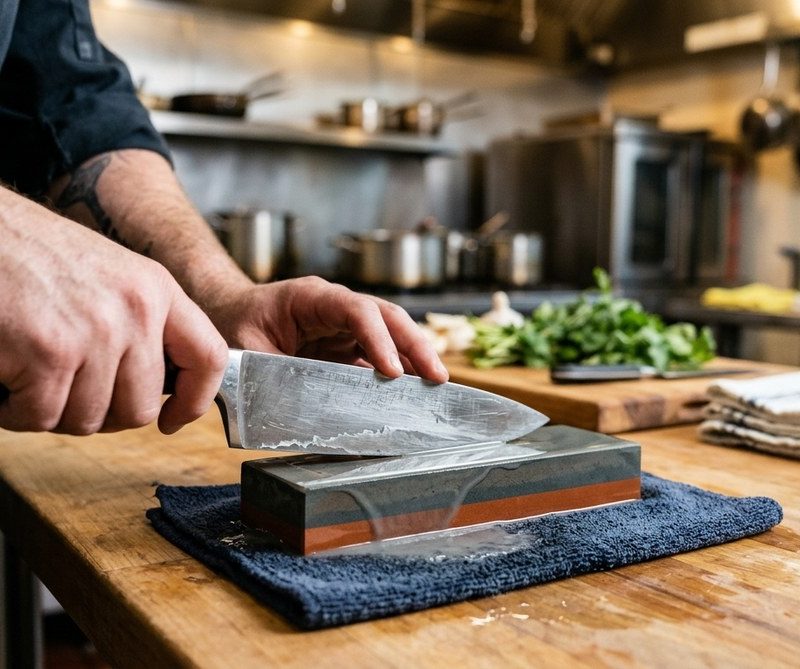
- Whetstone (1000/6000 grit): This is the gold standard. The coarse side reshapes the edge. The fine side polishes it.
- Honing rod (steel or ceramic): This does not remove metal. It straightens the existing edge between sharpenings.
- Angle guide: A small plastic wedge that clips onto the blade. It takes the guesswork out of holding the right angle.
- Damp cloth or non-slip mat: Keeps your whetstone from sliding around while you work.
- Leather strop (optional): Removes the final burr and gives a shaving-sharp finish.
Stay away from electric pull-through sharpeners. They remove too much metal and can ruin a good knife over time.
The Step-by-Step Method to Sharpen a Dull Knife
Follow these steps to bring your dull blade back to life. Plan on spending about 15 to 20 minutes for a very dull knife.
Step 1: Soak Your Whetstone
If you are using a water stone, soak it in water for 10 to 15 minutes. Bubbles will rise from the stone. When they stop, the stone is saturated. Place it on a damp cloth so it does not slide.
Step 2: Find Your Angle
Most Western-style knives need a 20-degree angle. Japanese knives are often sharper at 15 degrees. If you are unsure, stick with 20 degrees. Use an angle guide if you have one. Without a guide, hold the knife at a 45-degree angle to the stone, then cut that angle in half. You want the blade to sit flat against the stone at the correct angle.
Step 3: Start on the Coarse Side
Place the heel of the blade against the stone at your chosen angle. Use gentle, even pressure. Push the blade forward across the stone as if you are slicing a thin layer off the top. Keep the blade moving from heel to tip.
- Use 10 to 15 strokes on one side.
- Switch to the other side and do the same number of strokes.
- Repeat this cycle 3 to 5 times.
You are looking for a burr. A burr is a tiny ridge of metal that forms on the opposite side of the edge. You can feel it by running your thumb lightly across the blade (perpendicular to the edge, not along it). If you feel a small rough lip, you have formed a burr.
Step 4: Switch to the Fine Side
Flip the stone over to the finer grit. Repeat the same process. Use lighter pressure this time. The fine grit removes the scratches from the coarse side and polishes the edge. Do 10 strokes per side, alternating, until the burr is gone.
Step 5: Strop and Clean
If you have a leather strop, pull the blade across it (spine first, not edge first) 5 to 10 times per side. This removes any remaining microscopic burr. Wipe the blade clean with a damp cloth. Your knife is now sharp.
Common Mistakes That Keep Your Knife Dull
Even with the right tools, people make errors that ruin their sharpening efforts. Here is a table of mistakes and how to fix them.
| Mistake | What Goes Wrong | The Fix |
|---|---|---|
| Using too much pressure | You bend the edge or remove too much metal | Use light, steady pressure. Let the stone do the work. |
| Inconsistent angle | You round the edge instead of sharpening it | Use an angle guide or practice keeping your wrist locked. |
| Skipping the burr | You stop before the edge is fully formed | Always check for a burr before moving to the fine side. |
| Sharpening a dirty knife | Dirt and grease clog the stone | Wash and dry the knife before you start. |
| Using a honing rod incorrectly | You can actually dull the blade further | Hold the rod vertically and draw the knife down at a 20-degree angle. |
“A sharp knife is a safe knife. The moment you have to force a cut, you lose control. Take the time to sharpen, and your knife will reward you with every slice.” – Chef Frank Proto, Institute of Culinary Education
How Often Should You Sharpen?
This depends on how often you cook. A home cook who uses a knife daily should hone the blade once a week and sharpen it on a stone once every 2 to 3 months. A heavy user who preps large meals or works with tough ingredients may need to sharpen every 4 to 6 weeks.
You can test sharpness with the paper test. Hold a sheet of paper in the air. Try to slice through it with the knife. If it tears or catches, your knife is dull. If it cuts cleanly, you are good to go.
One Final Tip for Long-Lasting Sharpness
Store your knife properly. A knife block, magnetic strip, or blade guard protects the edge. Never leave it loose in a drawer. And always hand wash your knife. The dishwasher is a fast track to a dull, pitted blade.
If you are looking for more ways to improve your kitchen skills, you might enjoy learning about how to master the art of knife cuts without a cooking class. A sharp knife makes those cuts easier and more precise.
Your Knife Deserves Better
You bought a good knife for a reason. It should perform. A dull blade is not a lost cause. With a whetstone, a little patience, and the steps above, you can restore it to its full potential. The next time you reach for your chef’s knife, it will feel like a new tool in your hand. Take 15 minutes this weekend to sharpen it. Your cooking and your fingers will thank you.